Overview
You can render collections of R Markdown documents as a website using the rmarkdown::render_site function. This article describes the basics of creating websites with R Markdown and provides some examples which you can use as a starting point for your own websites.
The features described here are available only within the most recent version of the rmarkdown package (v0.9.6) which you can install from CRAN as follows:
The RStudio IDE also includes integrated support for developing R Markdown websites. These features are available in version 1.0 or higher of RStudio so you should be sure to update RStudio prior to using R Markdown websites. You can download the latest version of RStudio here: https://www.rstudio.com/products/rstudio/download/.
Simple Example
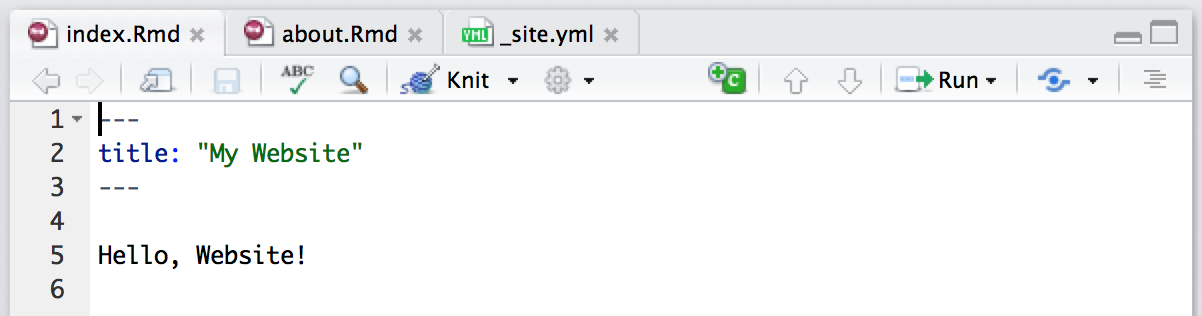
To start with let’s walk through a very simple example, a website that includes two pages (Home and About) and a navigation bar to switch between them:
_site.yml
index.Rmd
about.Rmd
Note that the minimum requirement for any website is that it have an index.Rmd file as well as a _site.yml file. If you execute the rmarkdown::render_site function from within the directory containing the website the following will occur:
All of the Rmd and md files in the root website directory will be rendered into HTML. Note however that markdown files beginning with "_" are not rendered (this is a convention to designate files that are included by top level documents).
The generated HTML files and any supporting files (e.g. CSS and JavaScript) are copied into an output directory (_site by default).
The HTML files within the _site directory are now ready to deploy as a standalone static website.
The full source code for simple example above can be found here: https://github.com/rstudio/rmarkdown-website-examples/tree/master/hello-website.
Site Authoring
RStudio
RStudio includes a variety of features intended to make developing R Markdown websites more productive. These features are available in version 1.0 or higher of RStudio so you should be sure to update RStudio prior to using R Markdown websites. You can download the latest version of RStudio here: https://www.rstudio.com/products/rstudio/download/.
Website Project
Note that all of the RStudio features for website authoring described below require the use of an RStudio Project tied to your website’s directory. See the documentation on RStudio Projects for additional information on how to create and use projects.
Individual Pages
As you work on the individual pages of your website you can render them using the Knit button just as you do with conventional standalone R Markdown documents:
Knitting an individual page will only render and preview that page, not the other pages in the website.
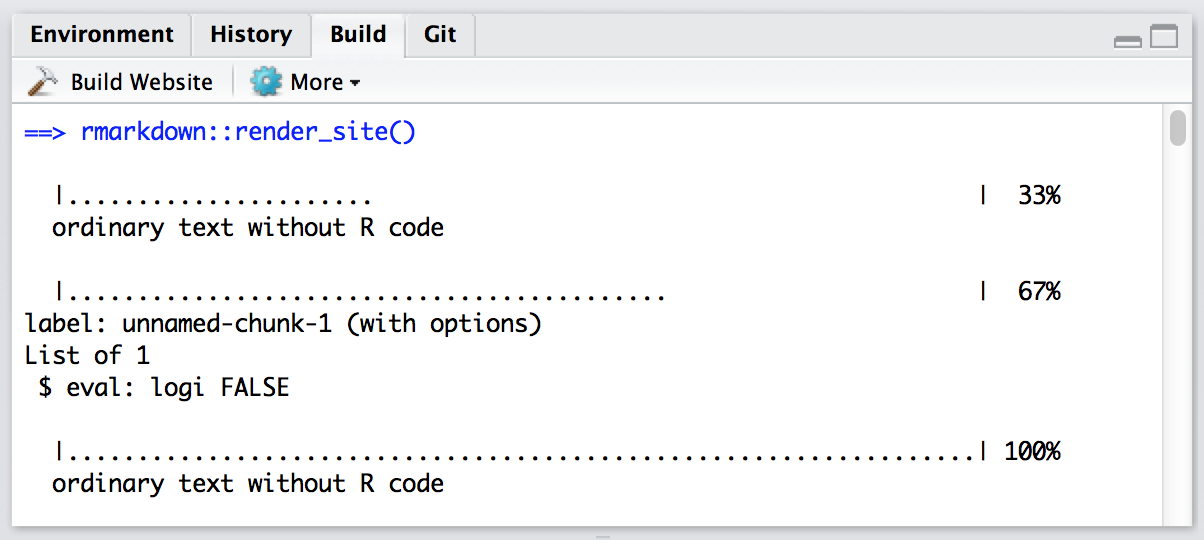
Entire Website
To render all of the pages in the website you use the Build pane, which calls rmarkdown::render_site to build and then preview the entire site:
Supporting Files
RStudio supports “live preview” of changes that you make to supporting files within your website (e.g. CSS, JavaScript, Rmd partials, R scripts, YAML config files, etc.).
Changes to CSS and JavaScript files always result in a refresh of the currently active page preview. Changes to other files (e.g. shared scripts and config files) trigger a re-knit of the active page preview (this behavior can be disabled via the options dialog available from the Build pane).
Note that only the active page is re-knit so once you are happy with the results of rendering you should be sure to rebuild the entire site from the Build pane to ensure that all pages inherit your changes.
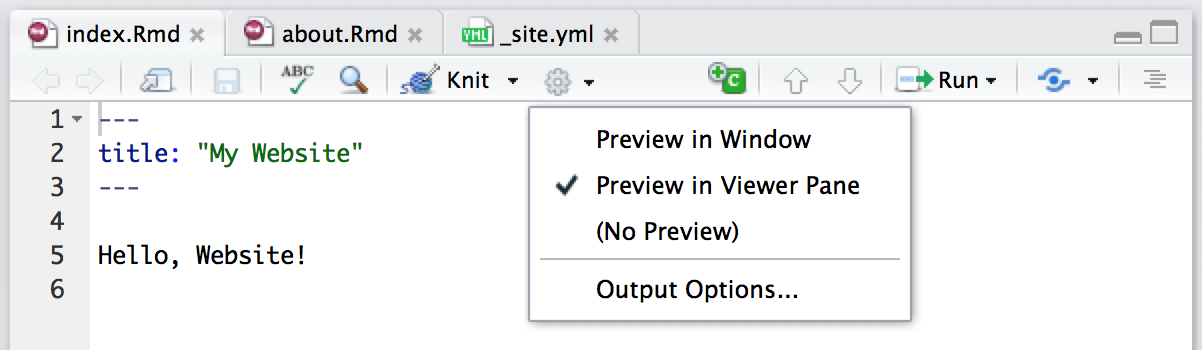
Side by Side Preview
When working iteratively on a page you might find it more convenient to preview it side-by-side with the editor rather than in an external window. You can configure RStudio to do this using the options menu on the editor toolbar:
Command Line
Rendering
If you aren’t working within RStudio and/or want to build sites from the command line you can call the render_site function directly from within the website directory. Pass no arguments to render the entire site or a single file in order to render just that file:
Cleaning Up
To clean up all of the files generated via render_site you can call the clean_site function, which will remove all files generated by rendering your site’s markdown documents including knitr _cache directories. You can specify the preview = FALSE option to just list the files to be removed rather than actually removing them:
knitr Caching
If your website is time consuming to render you may want to enable knitr caching during the development of the site so that you can more rapidly preview changes. To enable caching for an individual chunk just add the cache = TRUE chunk option:
```{r, cache = TRUE}
data <- longComputation()
```
To enable caching for an entire document add cache = TRUE to the global chunk option defaults:
```{r setup, include=FALSE}
knitr::opts_chunk$set(cache=TRUE)
```
Note that when knitr caching is enabled for an Rmd it’s _files directory will be copied rather than moved to the _site directory (since the cache requires references to generated figures in the _files directory).
Common Elements
Content
Typically when creating a website there are various common elements you want to include in all pages (e.g. output options, CSS styles, header and footer elements, etc.). Here’s some additions to the example above that makes use of common elements:
_site.yml
footer.html
styles.css
Note that we’ve included an output element within our _site.yml file. This defines shared output options for all R Markdown documents within a site. Note that individual documents can also include their own output options, which will be merged with the common options at render time.
As part of our common output options we’ve specified an HTML footer (via the include: after-body: option) and CSS stylesheet. Note that you can also include HTML before the body or in the document <head>, see the documentation on includes for more details.
In addition to whatever common options you define, the are two output options which are automatically set when rendering a site:
The self_contained option is set FALSE; and
The lib_dir option is set to site_libs.
These options are set so that dependent files (e.g jQuery, Bootstrap, HTML widget libraries, etc.) are shared across all documents within the site rather than redundantly embedded within each document.
R Scripts
If you have R code that you’d like to share across multiple R Markdown documents within your site you can simply create an R script (e.g. “utils.R”) and then source it within your Rmd files. For example:
```{r}
source("utils.R")
```
Rmd Partials
You may have common fragments of R Markdown that you want to share across pages within your site. To share Rmd fragments you should name them with a leading underscore (_) then include them within their parent Rmd document using the child chunk option. For example:
about.Rmd
---
title: "About This Website"
---

More about this website.
```{r, child="_sessioninfo.Rmd"}
```
_sessioninfo.Rmd
Session information:

```{r}
sessionInfo()
```
The leading underscore is an indicator to the site generation engine that the Rmd is a partial document to be included in other documents so it’s not Knit as a standalone document during site rendering.
The full source code for the above example can be found here: https://github.com/rstudio/rmarkdown-website-examples/tree/master/common-elements
Site Navigation
The navbar element of _site.yml can be used to define a common navigation bar for your website. You can include internal and external links on the navigation bar as well as drop-down menus for sites with a large number of pages.
Here’s a navigation bar definition that makes use of a variety of features:
_site.yml
This example demonstrates a number of capabilities of navigation bars:
You can use the type field to choose between the “default” and “inverse” navigation bar style (each theme includes distinct colors for “default” and “inverse” navigation bars).
You can align navigational items either to the left or to the right.
You can include menus on the navigation bar, and those menus can have separators (text: "--------------") and internal headings (text without a corresponding href).
You can include both internal and external links on the navigation bar.
- You can use icons on the navigation bar. Icons from three different icon sets are available.
When referring to an icon you should use it’s full name including the icon set prefix (e.g. “fa-github”, “ion-social-twitter”, “glyphicon-time”, etc.).
HTML Generation
R Markdown includes many facilities for generation of HTML content from R objects, including:
The conversion to HTML of standard R output types (e.g. textual output, plots, etc.) within code chunks done automatically by knitr.
A variety of ways to generate HTML tables, including the knitr::kable function and the xtable package.
A large number of available HTML widgets that provide rich JavaScript data visualizations.
As a result, for many R Markdown websites you won’t need to worry about generating HTML output at all (since it’s created automatically).
Site Configuration
The _site.yml file has a number of options that affect site output including where it is written and what files are included and excluded from the site. Here’s an example that makes use of a few of these options:
The name field provides a suggested URL path for your website when it is published (by default this is just the name of the directory containing the site).
The output_dir field indicates which directory to copy site content into ("_site" is the default if none is specified). Note that this can be “.” to keep all content within the root website directory alongside the source code.
Included Files
The include and exclude fields enable you to override the default behavior visa-vi what files are copied into the output directory. By default, all files within the website directory are copied into the output directory (e.g. "_site") save for the following:
Files beginning with “.” (hidden files).
Files beginning with "_"
Files known to contain R source code (e.g. “.R”, “.s”, “.Rmd”), R data (e.g. “.RData”, “.rds”), or configuration data (e.g. “.Rproj”, “rsconnect”)).
The include and exclude fields of _site.yml can be used to override this default behavior (wildcards can be used to specify groups of files to be included or excluded).
Note that include and exclude are not used to determine which Rmd files are rendered (all of them in the root directory save for those named with the _ prefix will be rendered).
Publishing Websites
R Markdown websites are static HTML sites that can be deployed to any standard web server. All site content (generated documents and supporting files) are copied into the _site directory so deployment is simply a matter of moving that directory to the appropriate directory of a web server.
This section provides additional documentation on publishing websites to several popular hosting services.
GitHub Pages
R Markdown websites are can be hosted using GitHub Pages with two additions to the standard site configuration:
Add a file named .nojekyll to your site source code directory (this tells GitHub Pages to not process your site with the Jekyll engine).
Change your output directory to “.” within _site.yml. For example:
output_dir: "."
This keeps all of your output side-by-side with your source code in the root of your website (rather than writing it to the _site directory).
Note that when deploying to GitHub Pages using this configuration your source code, data, and everything else in your repository is all publicly available alongside your generated website content.
Alternatively, you can configure GitHub Pages to publish from a /docs subdirectory of your repository. If you work in this configuration you should change your output directory to “docs” within _site.yml. For example:
output_dir: "docs"
You can find an example of a minimal R Markdown website configured for publishing to GitHub Pages here: https://github.com/rstudio/rmarkdown-website-examples/tree/master/gh-pages.
Other Web Hosts
There are a wide variety of options for static web hosting, all of which are compatible with R Markdown websites. This guide includes an overview of several of the more popular services: http://alignedleft.com/resources/cheap-web-hosting.
Additional Examples
Here are some additional examples of websites created with R Markdown:
| rmarkdown |
This website was created using R Markdown. There are a large number of pages (over 40) that are organized using sub-menus on the navigation bar. Disqus comments are included on each page via an after_body include. |
View code |
| flexdashboard |
Documentation for the flexdashboard R package. Illustrates using an R script to dynamically generate HTML thumbnails of flexdashboard examples from YAML. |
View code |
| bookdown |
Home page for the bookdown R package and publishing service. Illustrates creating a site with a completely custom theme (no use of Bootstrap). |
View code |